UNDERSTANDING THE PAPER KIT LAYOUT
LAYOUT DETAILS
-

LAYOUT SIZES
Paragami layouts are available in four sizes:
• S — 250 blocks
• M — 500 blocks
• L — 1,000 blocks
• XL — 1,500 blocks
Each size uses the same logic and structure — only the scale changes. -

LAYOUT FORMAT
All layouts are printed on a 914 mm wide tracing paper roll.
The paper is semi-transparent, allowing you to see the surface underneath while positioning or mounting.For larger sizes, the layout is delivered in two long strips.
These include dashed alignment guides that show exactly how to overlay and align them correctly. -

LAYOUT SECTIONS
Each layout includes:
Summary table
showing how many blocks are needed per color and type. Color information represented using hatch patterns.
Layout gridshowing the position and orientation of every block


ASSEMBLING THE LAYOUT

EXAMPLE
-

From the bundle page, we can see that Color 5 is SHARK.
-

In the summary table, we see that four blocks of type D are needed in SHARK.
-

Find the four cells marked with block type D and with the hatch pattern matches Color 5 (the number 5 is also printed inside the cell for confirmation).
-

Fold the four SHARK blocks of type D and place them into the matching cells, following the orientation marks.


-
Physical
PAPER KITPaper Components
HEXSPIRE: 50 BLOCKS PACKAGE / PARAGAMI PAPER KIT 101_000
Regular price From $11.81 USDRegular priceUnit price per$0.00 USDSale price From $11.81 USD -
Physical
PAPER KITPaper Components
HEXSPIRE: LAYOUTS / PARAGAMI PAPER KIT 101_000
Regular price From $5.91 USDRegular priceUnit price per -
Physical
PAPER KITPaper Components
VOLCANO CALDERA / HEXSPIRE 101_003
Build your bundle from:Regular price $61.27 USDRegular priceUnit price per$0.00 USDSale price $61.27 USD -
Physical
PAPER KITPaper Components
CORNER RIPPLES / HEXSPIRE 101_002
Build your bundle from:Regular price $61.27 USDRegular priceUnit price per$0.00 USDSale price $61.27 USD -
Physical
PAPER KITPaper Components
FLORAL CIRCLE / HEXSPIRE 101_004
Build your bundle from:Regular price $61.27 USDRegular priceUnit price per$0.00 USDSale price $61.27 USD -
Physical
PAPER KITPaper Components
FISSURED HUMP / HEXSPIRE 101_001
Build your bundle from:Regular price $61.27 USDRegular priceUnit price per$0.00 USDSale price $61.27 USD -
Physical
PAPER KITPaper Components
HELIX RAMP / HEXSPIRE 101_011
Build your bundle from:Regular price $107.79 USDRegular priceUnit price per$0.00 USDSale price $107.79 USD -
Physical
PAPER KITPaper Components
CIRCULAR CREASE / HEXSPIRE 101_012
Build your bundle from:Regular price $107.79 USDRegular priceUnit price per$0.00 USDSale price $107.79 USD -
Physical
PAPER KITPaper Components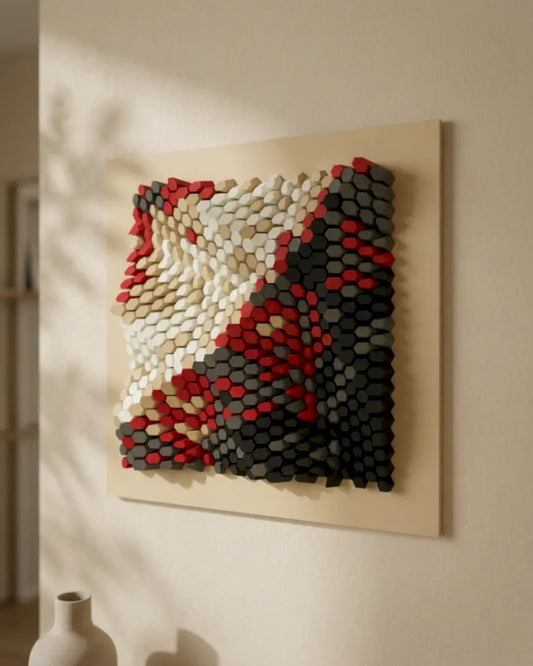
LEAF VEINS / HEXSPIRE 101_013
Build your bundle from:Regular price $107.79 USDRegular priceUnit price per$0.00 USDSale price $107.79 USD -
Physical
PAPER KITPaper Components
STARRY NIGHT "M" / HEXSPIRE 101_014
Build your bundle from:Regular price $107.79 USDRegular priceUnit price per$0.00 USDSale price $107.79 USD -
Physical
PAPER KITPaper Components
MONA LISA "M" / HEXSPIRE 101_015
Build your bundle from:Regular price $107.79 USDRegular priceUnit price per$0.00 USDSale price $107.79 USD -
Physical
PAPER KITPaper Components
CREASED CANVAS / HEXSPIRE 101_021
Build your bundle from:Regular price $174.24 USDRegular priceUnit price per$0.00 USDSale price $174.24 USD -
Physical
PAPER KITPaper Components
WATER WHIRL / HEXSPIRE 101_022
Build your bundle from:Regular price $174.24 USDRegular priceUnit price per$0.00 USDSale price $174.24 USD -
Physical
PAPER KITPaper Components
DIAMOND UPHOLSTERY / HEXSPIRE 101_023
Build your bundle from:Regular price $174.24 USDRegular priceUnit price per$0.00 USDSale price $174.24 USD -
Physical
PAPER KITPaper Components
ORBIT FUSION / HEXSPIRE 101_024
Build your bundle from:Regular price $174.24 USDRegular priceUnit price per$0.00 USDSale price $174.24 USD -
Physical
PAPER KITPaper Components
STARRY NIGHT / HEXSPIRE 101_031
Build your bundle from:Regular price $239.21 USDRegular priceUnit price per$0.00 USDSale price $239.21 USD -
Physical
PAPER KITPaper Components
MONA LISA / HEXSPIRE 101_032
Build your bundle from:Regular price $239.21 USDRegular priceUnit price per$0.00 USDSale price $239.21 USD -
Physical
PAPER KITPaper Components
ATLAS / HEXSPIRE 101_033
Build your bundle from:Regular price $239.21 USDRegular priceUnit price per$0.00 USDSale price $239.21 USD -
Physical
PAPER KITPaper Components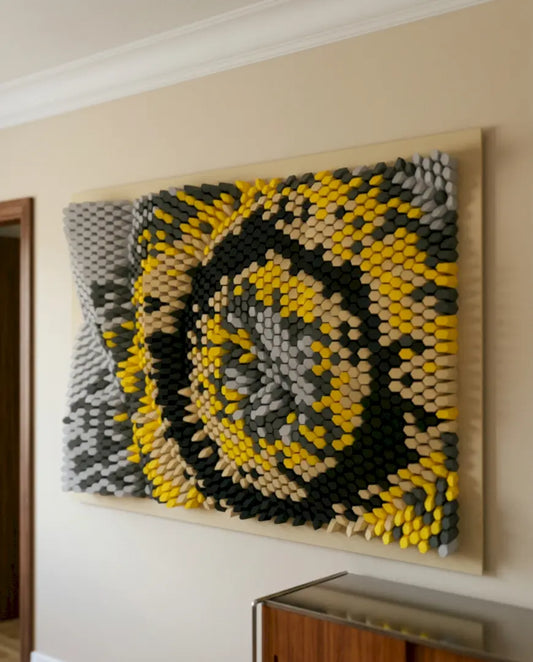
SUN ERUPTION / HEXSPIRE 101_034
Build your bundle from:Regular price $239.21 USDRegular priceUnit price per$0.00 USDSale price $239.21 USD


